
Top 10 Homicide Inducing Crafts

Crochet/Knitting
I can't. This craft has plagued me since I was a middle-schooler. As many times as I've tried, and as much as I love yarn, I will never be a crocheter/knitter. It makes my heart a little sad. I think I'm just a little special when it comes to being able to maneuver my hands? I say this because I kind of suck at playing the piano, too. I know that my hands work...because I obviously make things. And I know that my brain works...sparingly. But they just can't seem to share the same project space where planning and tactical maneuvering is involved. Almost every year, like clockwork, when the leaves start changing and the sweltering summer heat is replaced with that crisp breath of autumn air, I'll decide that it is the time for me to learn to crochet. And, like clockwork, I'll end up with a blanket that looks like a project from some sort of stroke-victim outreach program where people are taught to use their limbs again. But I have amassed a very nice collection of beautiful yarns...that I'll never use. Well, until I discovered weaving. It gives me the same satisfaction as I assume I'd get from crocheting something. And I don't actually have to have yarn talent for it. I suggest weaving for the yarny-challenged.

Coffee Filter Crafts
There are so many adorable things you can make with coffee filters! Flowers, garland, dimensional embellishments, wreaths, mini-Christmas trees, the list goes on with new crafts added hourly. This staple of the crafting world really is versatile, and can be quite beautiful when done correctly. The downside is that it takes FOR-FREAKING-EVER. I started making a coffee filter wreath (seriously, they are so pretty) in October of 2013. I finished it by May of 2014. The whole point of making it was for fall decor. So, yeah, 7 months later I had an awesome fall wreath. To be perfectly honest, I love that wreath, but it took a few years off of my general life span. Maybe if there were a quicker way to do it, but expect at least a few weeks, even with diligent work. I haven't found a crafthack for this one, although you can get a similar look by gluing faux white chrysanthemums to a foam wreath form. This takes a couple of hours, a mere fraction of the time you'd spend with all of those coffee filters.
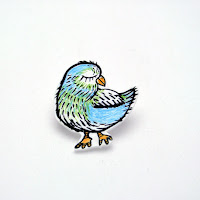
Shrink Plastic
I have a love/hate relationship with shrink plastic. I've made several pieces with it over the years (and even published a post on using it for children's keepsake keychains), but it hasn't always been a super easy road. First of all, just don't even attempt to follow the oven instructions. Part of the shrinking process is the curling of the edges, but it always freaks me smooth out when it happens, then I want to pull it out and try to uncurl it. I always end up burning my hands, then it has to go back in and ends up all wonky. It's just...don't use the oven. Instead, I've had far more consistent luck with a heat embossing gun. You can buy the exact one that I use here (I even used a 40% off coupon to get it cheaper and it has been well worth the investment). The curling from the heat gun is more controlled with the heat embosser and you can use a wooden skewer to hold your film while it is in the shrinking process. It helps me to get a more uniform shape to my cutouts. But, expect to burn your fingers a few times when attempting this craft. Also, you'll probably ruin a few of your first cutouts; sometimes the film curls to itself and there's nothing that you can do this side of performing a Eucharistic miracle.
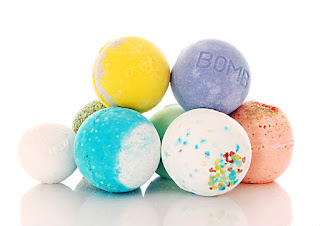
Bath Bombs
These little effers are so hard to make. Don't get me wrong, type "Easy DIY Bath Bomb" into Pinterest and there will be no shortage of hits promising you the easiest bath bomb recipe ever. Here's the thing: they're lying. It's difficult. My first few attempts looked like lilac unicorn shit. Well, I've since figured out a recipe that's basically no-fail for me, but it was a very expensive road paved in tears and baking soda. Why are they so hard? Citric acid. This is the key ingredient for both hardness and fizziness with bath bombs. It is also highly reactive with water (resulting in fizzing). The problem is that you only get one shot at the fizz. If you fizz your citric acid during the mixing process, it's neither going to set up in your molds nor react with water. Bottom line: learn from my mistakes. If your mixture is too sandy and not holding shape, add more oil, do not add more water.
Macrame
Macrame could fall under the same category as crocheting/knitting for me because I have the same problems with it. YouTube makes it a little easier to understand the knotting techniques, but the patterns are just impossible. Plus, it's pretty cheap to purchase. I'll just save myself the frustration and buy that ish on Etsy, thanks.

Salt Dough Ornaments
This is just kind of one of those crafts that is attempted more for the "I actually did this" factor rather than the outcome of the project itself. I've never made salt dough ornaments that didn't turn out cracked and lumpy. Furthermore, I'm pretty sure some of those awesome Pinterest salt dough tutorials actually feature their products cast in clay. It's the only possible way. Or maybe I'm just not blessed by the salt dough gods. Regardless, there is a variety of oven-bake and air-dry clay that works beautifully! And it's cheap!
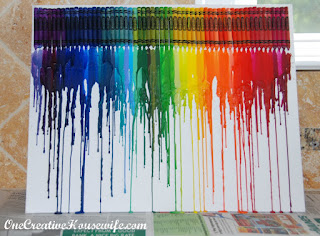
Melted Crayon Art
Actually I didn't have a bad experience with this one, but I know so many people that did. This image went viral in 2012 and sent every soccer mom in the northern hemisphere running to Wal-Mart for Crayola crayons and a canvas. Here's the skinny on this project, you WILL make a mess. I promise you that much. So, make sure you do it outside and in old clothes. While a hair dryer will work for this project, it will splatter your colors because of the high heat setting. And you do have to use the high heat setting to actually melt the crayons. Instead, use the same heat embossing gun I mentioned for shrink plastic projects to get your crayons to melt evenly and with minimal splattering. You'll get a much nicer drip effect and the 'wind' from the embosser is pretty low-key. The temp on embossing guns is very high, though, so you'll want to supervise closely or do it yourself.

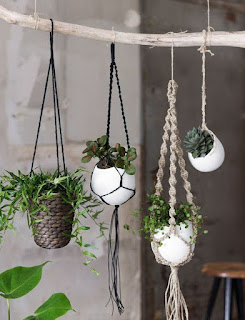
Succulent Terrariums
These are so beautiful and gaining favor by the minute. Look up any bohemian-influenced store and you'll not be surprised to find their advertisements infused with the fleshy botanicals. Another viral topic on Pinterest, there are many many options for creating your own succulent terrarium. All promise to be fool-proof, promoting succulents as virtually death-proof. Unfortunately, that's not true. Some succulents can be very temperamental. Also, while you'll probably read that they are low-water, high-light plants, that's not true for all varieties. Plus, some succulents are loners; they don't like to share their space. Aesthetically, succulents are generally a very attractive addition to your space; they add instant character, but they can be very tricky to maintain. It depends on how you want to display your plant, but the obvious hack to this is to use fake succulents. I have done this plenty. Unlike other types of plants, you can get a good fake succulent for about the same price as a real succulent...and you can hardly tell the difference (even if you touch it!). I like to mix fake succulents in with my real succulents also to add variety without compromising the health of my plants. The one thing I always do, though, is to 'plant' them in real soil. You'll fool everyone.

Pallet Projects
These guys are everywhere! Make a sign with a pallet; make a bench with a pallet; make an entire tiny house with a pallet. You can pretty much construct an entire civilization from these things. Brought into light by the idea of repurposing something that is largely free, pallet projects showcase endless possibility while promising minimal work. Pallets are much harder to work with than what is advertised. First of all, you'll spend a good two hours taking them apart and removing nails and that's only the prep work. Pallet projects are very labor intensive, and they require the use of power tools (which isn't normally a concealed issue). They also have lots of imperfections, which is desirable for some, but notsomuch for others. I personally just don't want to have to take the time to locate the pallet, transport the bulky thing, clean it, prep it, all before I actually start the project. So, my solution for pallet-esque projects is to buy pine 1x6's at Lowe's. They're about $3 for a 10 foot plank. So, under $10 for the same amount of wood as a pallet, and all of it is usable. Plus, no prep, cleaning, or hole-filling. There are tons of ways to distress this type of wood and it's very easy to cut and manipulate. Considering that many places now charge for pallets, that sounds like a heck of a deal to me.

Gallery Walls
From their content to actually hanging the things, gallery walls are not the easiest of craftventures. Although they look reasonably easy to pull off, it takes a bit of planning to get a gallery wall right. There's the elements of color: they have to compliment each other. There's shapes and likenesses of picture frames. And then there's the actual hanging part...definitely my least favorite part of the entire endeavor. Although, I really love how they look when they are complete. A gallery wall can really bring a room together and serve as an interesting focal point (especially in places that lack fireplaces). The easiest way that I've found to hang gallery walls is to take pieces of paper that are the dimensions of the pieces I'm hanging and put those on the wall with tape first, until I get the arrangement I like. You save yourself from putting extra holes in your beautiful walls that way. And worried about cohesion? Use all black, white, or wood frames to maintain uniformity! A quick coat of spray paint will fix you right up if you have a bunch of mismatched frames.
Crafting is not always easy, but it's usually worth it in the end. I hope this little list of hacks helps you with your future endeavors!
xo, Karee
No comments:
Post a Comment